P205-XplorAA - Adapter, Super Lamp Power Supply - GBC XplorAA
by Photron
Sold out
Original price
$99.00
-
Original price
$99.00
Original price
$99.00
$99.00
-
$99.00
Current price
$99.00
Photron's P205-XplorAA is designed for use in our P200 Superlamp powersupply for GBC's XplorAA AAS instruments.
Designed for P800S 3volt superlamps
Installation Instructions
Objective: To connect a Photron Super lamp to a GBC XplorAA AAS.
Materials:
- GBC XplorAA AAS
- Photron 3 volt super lamp power supply P200
- Photron P205-XplorAA adapter kit
Procedures: Warning: When powered, lamp circuitry runs at high voltage.
- Turn off power to instrument and unplug. Optional 1. Access from Lamp compartment to complete wiring or 2.Remove cover from AA, being careful not to let cover collide with PCB components.
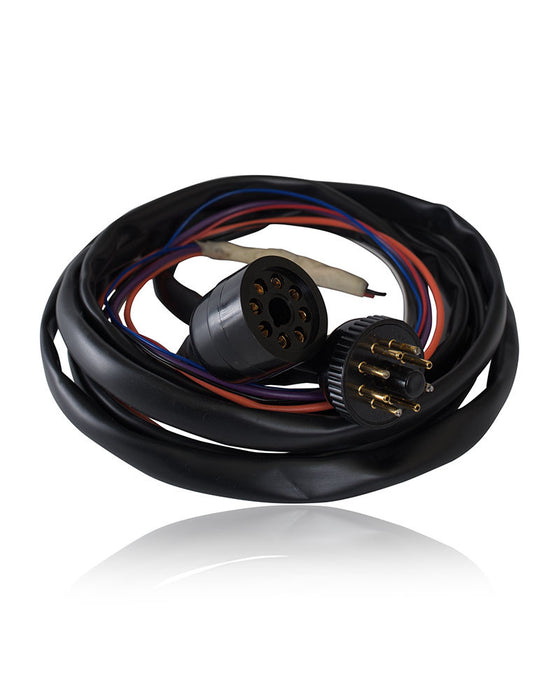
- Unscrew the rear octal cover from lamp position 1.
- Note the 2 black wires soldered to pins 1 and 3 of the octal socket.
- With tape or similar, mark each black wire with its pin numbers 1 and 3.
- Unsolder each black wire from the octal socket.
- Feed the adapter cable through front of lamp compartment first.
- Referring to diagram, solder black wire ‰ÛÏ1‰ to the black wire on adapter.
- Referring to diagram, solder black wire ‰ÛÏ3‰ to the red wire on adapter.
- Insulate both of these connections with 2 layers of heat shrink tubing.
- Solder the white wire on the adapter to pin 3 of the octal socket.
- Solder the blue wire on the adapter to pin 1 of the octal socket.
- Solder the violet wire on the adapter to pin 7 of the octal socket.
- Solder the orange wire on the adapter to pin 5 of the octal socket.
- Connect octal plug P1 to octal socket on flying lead from Superlamp Power Supply.
- Connect octal socket S1 to octal plug mounted on rear of Superlamp Power Supply
- Remove top cover of Photron Superlamp Power Supply.
- Locate trimpot on the smaller filament control PCB.
- Connect multimeter leads to pins 5 and 7
- Adjust trimpot until voltage equals 2.4 Volts DC.
- Replace covers